Padding Vs Margin Explained
Padding and margin are two important elements in web design, but there tends to be some confusion as essentially they do the same thing – they create extra space. But where? Which one to choose? What are the differences? Good practices?

I’ll answer all of these questions in this post and it’s my guarantee that at the end, you’ll be able to work with both confidently.
To start off, here’s a quick look at what they are.

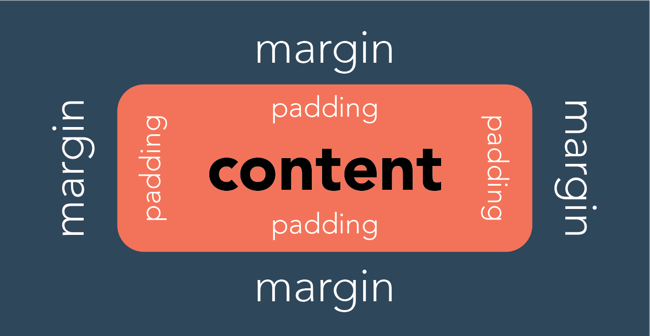
As you can see from the illustration:
- Padding is what creates a space inside the element/container;
- Margin is what creates a space around the element/container.
They both influence the layout in different ways, so let’s dive in deeper.
Note: Between margin and padding is another parameter – border. It will adjust together with padding and margin. But it’s what sets them apart. Also, it’s the only “visible” parameter of all these. Others create a space with what’s already there.
What Is Padding?
Padding, as stated before, is the increased space inside the content area. It will make the whole block bigger but from the inside.

To illustrate, here are two blocks of content containing text, a button, and a colored background. The first one has no padding and the second one has 20px padding added on all sides. So the inside gap has gotten bigger, but it’s still contained within the border.
When to use padding:
- To create a gap between the edges of the container and the content in it;
- You want to increase the size of the content block, or create a bigger space within the border;
- Increase the size of the content block without making the content itself bigger;
Example: You have a button and you want to make it bigger. Add padding!

- You wish to push the border further away from the content;
- To show more/less of the background of your content block;
Example: You have a blog homepage and you’ve created posts, but the image should show the cat photo you’ve looked so long for. Add padding (to the bottom in this case)!

- Center content inside the content block (using the same value for all sides).
As you might already tell, the padding makes a big difference in the layout you want to create.
What Is Margin?
Margin is what creates the gap around the content block, by “pushing” the content away. It’s always outside of the border.

And again, here are two content blocks. One without margin – other with 20px margin on all sides. The block stays the same, it the outside space that is influenced.
When to use margin:
- To create a gap/space around the content block;
- To make a space between two elements;
Example: You want to create some “breathing room” between your products. Add margins!
- Center the content block (using the same value for all sides);
- To create a space around the border.
Margin vs Padding
You might be thinking – Ok, but if I don’t use different colors or images? I can just choose whichever. Unfortunately, there are cases where you can use only one or the other. Here are some key elements that set them apart.
Layout
If you are using different colors or images for content blocks, the difference between margin and padding is obvious. You’re going to increase the area around the content with the margin, and the other way around with the padding.
So in terms of design, the achieved effect is different, therefore you can create different layouts. As you can see by the example below. The one on the left has margin applied and the one on the right has a bigger value of padding.

Negative Margin
You can create a negative margin to make one content block overlay another content block, like in the image below. This can be a very handy design tool.
This is not possible with padding as it doesn’t affect the outside of the content area.

Color
Another important difference is that margin itself has no color, but padding, on the other hand, will take up space with the same color (or image) as the background of the content box. Border, however, is independent color-wise. You can choose whichever color you wish.
As you can tell, it mostly comes down to the aesthetic.
Margin and Padding in CSS
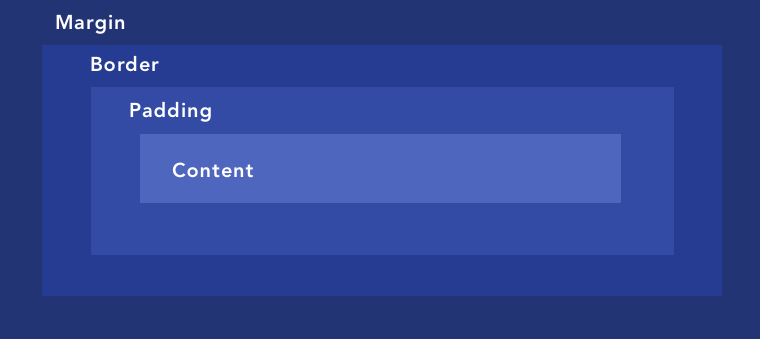
In CSS margin and padding (and border) are a part of the box model. The structure of the box model is the following – in the middle, there’s the content, then padding, then the border and then margin.
Below you can see an illustration of a CSS box model.
This allows adding the spaces we’ve already covered previously.
How to Control Padding and Margin in Visual Composer
If you are using Visual Composer, adjusting padding and margin (and border) is extremely easy. What you can use is the so-called “Onion Controls”, where you can change the value of each of these parameters. You can do that for any element in Visual Composer.

You can find the “Onion Controls” in the Design Options of every content element.
As you can see, apart from margin and padding, you can adjust the border as well as the radius for the corners. Simply write down the pixels and it will automatically be applied to your element.
You can also use the “Simple controls” toggle if you want to apply the same value on all sides. Just write down one value for each parameter and it will be applied all around.
Time to Get to Work
At the end of the day, it all depends on what you want to achieve. Remember that giving “breathing space” to your design is always a good idea and a great way to achieve that is by using margin and padding.
By knowing what these parameters are, you have all the tools to create a layout that is going to look exactly how you want it too.
If you’re new to CSS, you might have heard the words margin and padding but aren’t quite sure what they mean, or how to use them in your website designs. These concepts do similar things in CSS. However, they’re not quite the same, and there are important fundamental differences in their usage.

Once you fully understand the difference between margins and padding, you’ll be able to make better design decisions for your website. So let’s take a look at these two properties and what they do. We’ll include plenty of visual examples to illustrate how these important CSS components work.
What’s the difference between margin and padding in CSS?
In CSS, a margin is the space around an element’s border, while padding is the space between an element’s border and the element’s content. Put another way, the margin property controls the space outside an element, and the padding property controls the space inside an element.
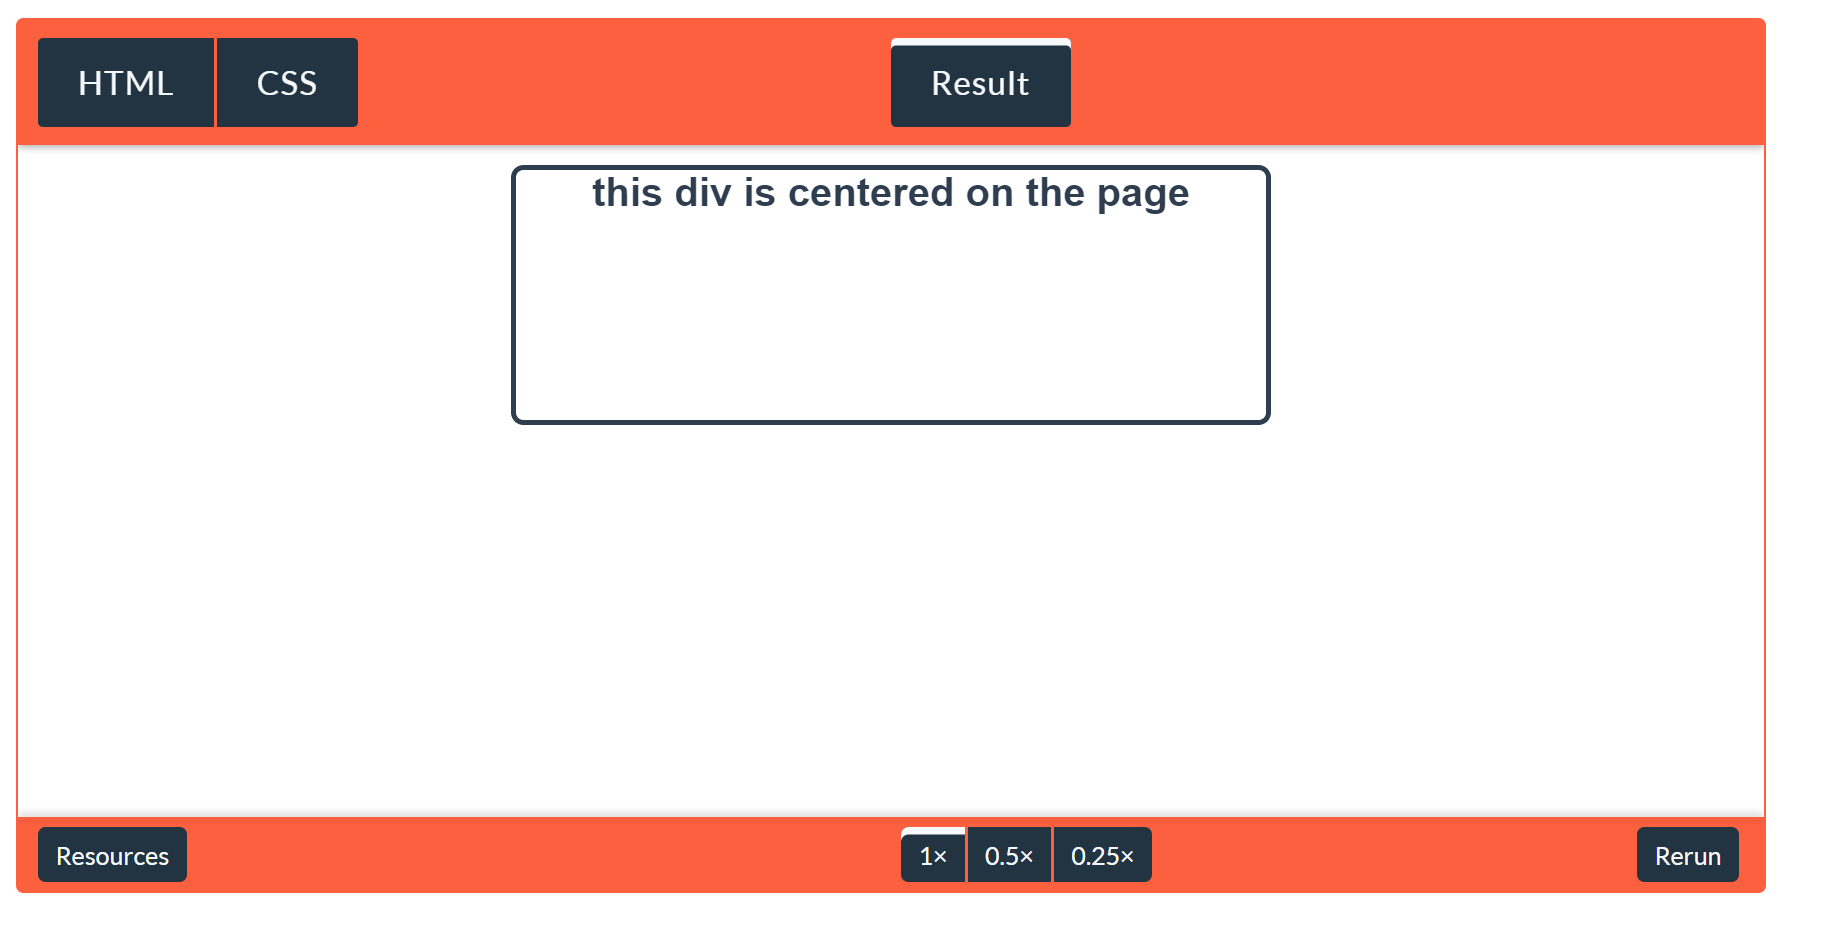
Let’s explore margins first. Consider the element illustrated below, which has a margin of 10 pixels:
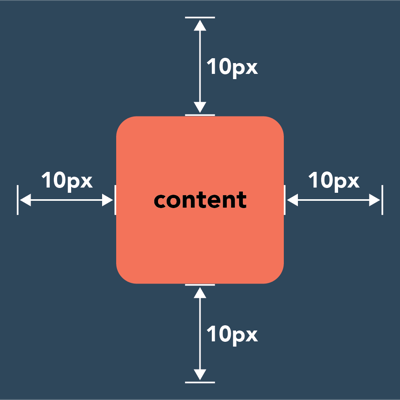
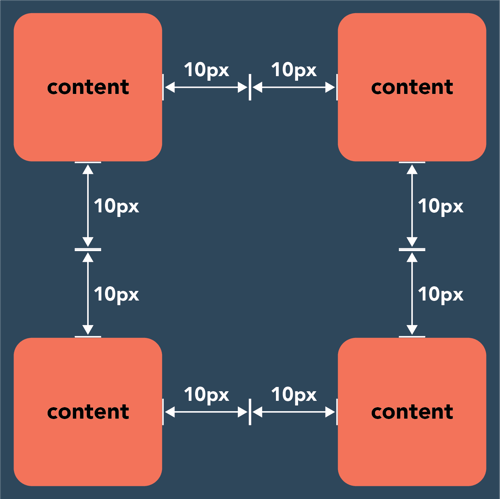
This means that there will be at least 10 pixels of space between this element and adjacent page elements — the margin “pushes away” its neighbors. If we put multiple of these elements together, we see how margins create whitespace between them, giving them room to breathe:
On the other hand, padding is located inside the border of an element. The element below has padding of 10px on the left and right sides, and padding of 15px on the top and bottom sides:
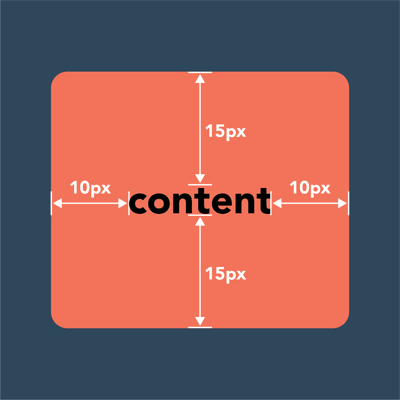
To create the gap, the padding either grows the element’s size or shrinks the content inside. By default, the size of the element increases. If you want to create the gap by shrinking the content, set the box-sizing property to border-box (i.e. box-sizing: border-box).
When to Use Margin vs. Padding
In general, use margins when you’re adjusting the spacing of an element in relation to another element (i.e a div in relation to another div on the page), and padding when you’re adjusting the look of an individual element (i.e the amount of pixels between the edge of a div and the text within it).
When you’re adjusting the layout of your design, you’ll need to determine whether to change the margins or the padding to achieve the desired visual effect. In this section, we’ll give some common uses for each property, starting with margins.
Uses for Margins
CSS margins determine the space surrounding an element. Therefore, margins can be used to…
1. Change an Element’s Position on the Page
CSS margins can move an element up or down on the page, as well as left or right. If the width of your page is fixed, centering an element horizontally is simple: Just assign the value margin: auto.
2. Set the Distance Between Nearby Elements
Margins determine the amount of space between adjacent elements, or whitespace. Whitespace is important for making web pages visually palatable. For instance, use margins to add space between images or between an image and the text description below it:

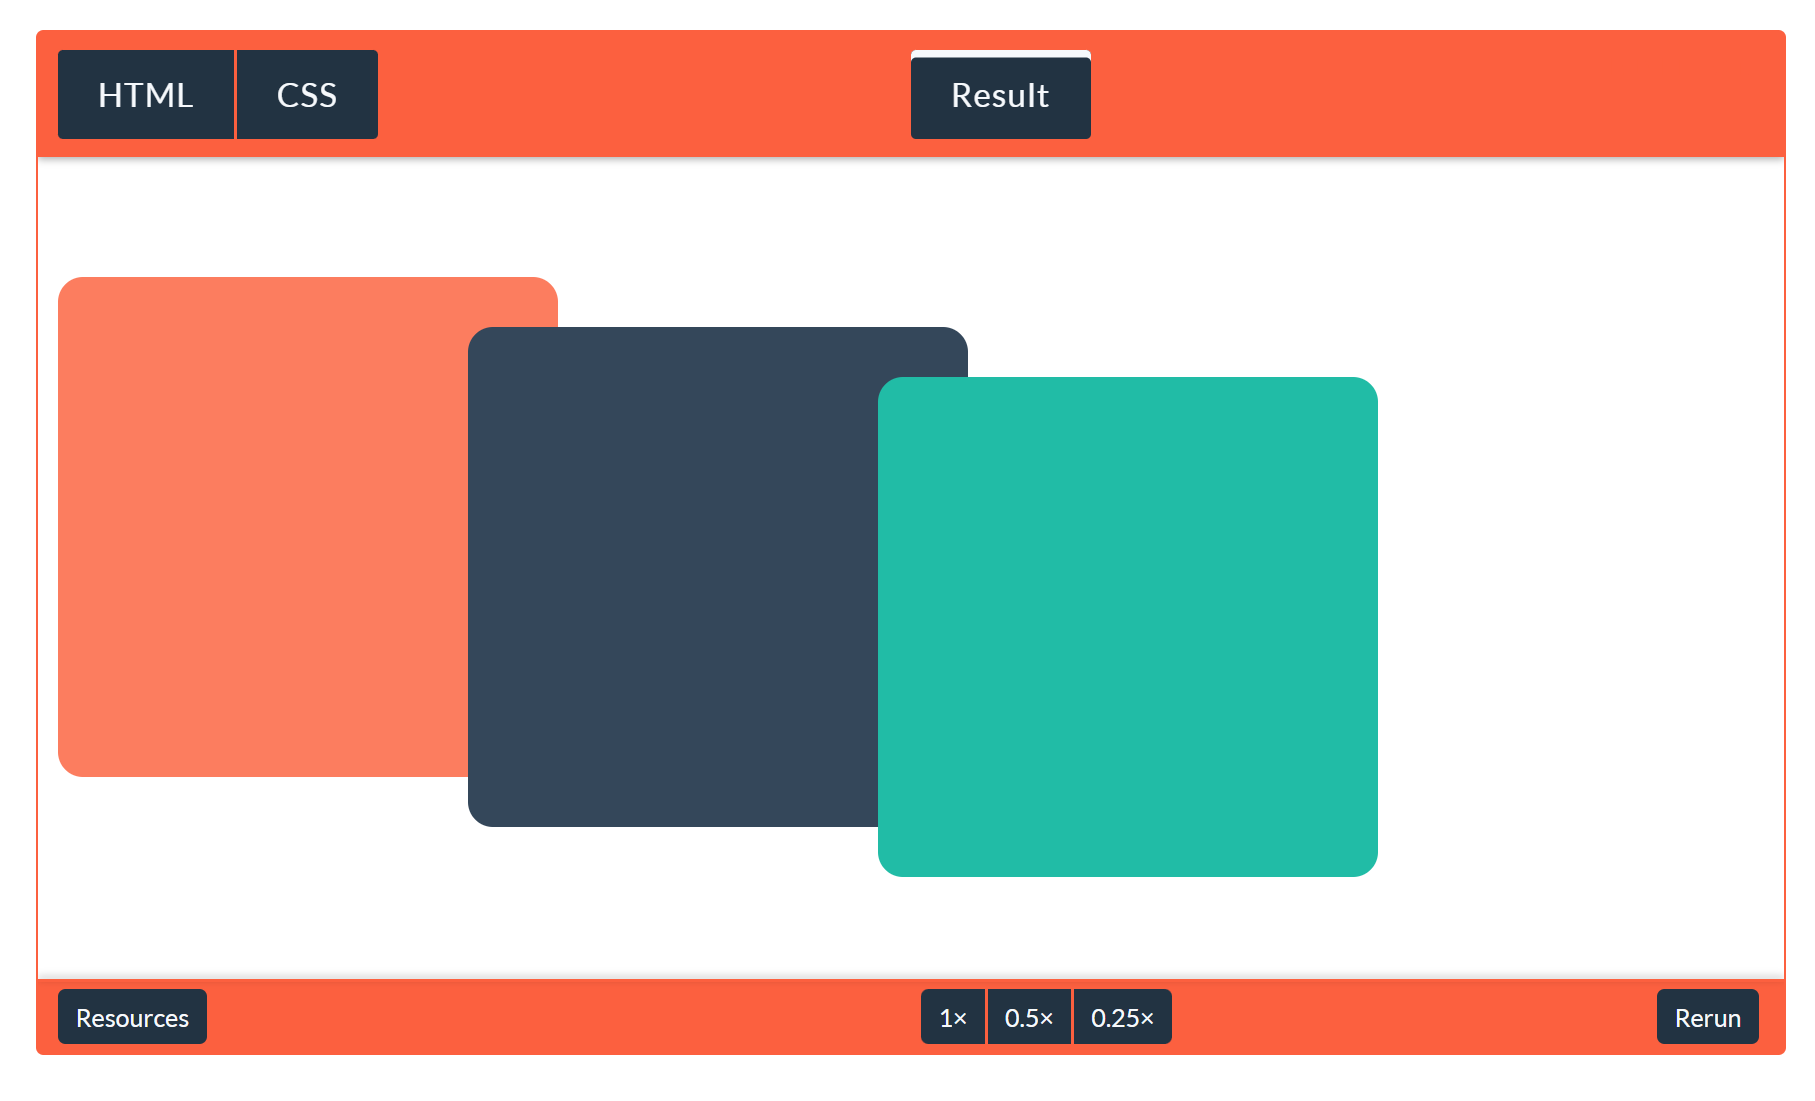
3. Overlap Elements
On the flip side, a negative margin value lets you overlap page elements. This can come in handy when trying to achieve a broken grid effect.
Uses for Padding
CSS padding determines how content looks within its respective element. You can change CSS padding to achieve the following effects:
1. Add Space Between Content and Its Border
This is the most common use of padding, and it’s useful for creating whitespace inside your elements.

2. Change the Size of an Element
When you increase the padding value, the content will stay the same size, but you will add more space around the content. This is useful for interactive elements, like buttons, when you want to expand the clickable area.
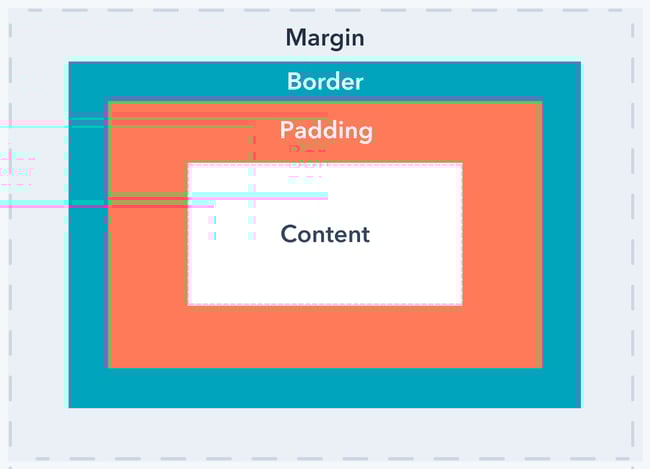
The CSS Box Model
To see how margins and padding work together to set spacing around an element’s content, we can also use the CSS box model. The CSS box model is used for page design and layout. Essentially, every HTML element in a document is wrapped inside a layered box that consists of the margin, border, padding, and content:
Applying height and width to your elements is easier once you understand the CSS box model. To ensure proper alignment, you’ll just need to do some simple math. However, if you’re confused about how the box model works, you could end up with a sloppy layout. To learn more about this concept, see our guide to the CSS box model.
CSS Margin vs. Padding vs. Border
The border is the layer of the CSS box model that sits between margin and padding. By default, the border does not have any width, but you can set one with the CSS border property.
Margin and padding are always parts of an element, even if there’s no visible border. This image illustrates such a case:
This can be a bit confusing for beginners — the two blocks of content don’t have a visible border, but the margin and padding still apply.
How to Add Margins in CSS
Every HTML element has four margins that you can toggle: top, right, bottom, and left.
To set the same margin value on all four sides of an element, use the margin property. To set the margin for specific sides of an element, use the margin-top, margin-right, margin-bottom, and margin-left properties.

You can also specify the margin property with two, three, or four values depending on the sides you want to apply margins to. If you want even margins on every side, you’ll only need to apply one value. Otherwise, the order of the values is important:
- Two values apply to the top and bottom, then right and left.
- Three values apply to the top, then right and left, then bottom.
- Four values apply to the top, then right, then bottom, then left.

Each value can be represented as a fixed length (often in px), a percentage (which defines the value as a percentage of the width of its container), or auto (which lets the browser set the margin).
How to Add Padding in CSS
Like with margins, padding has four sides to be declared: top, right, bottom, and left.
To set padding on all sides, use the shorthand property padding. To set padding for a specific side, use the padding-top, padding-right, padding-bottom, and padding-left properties.

When using the padding shorthand property, you may also define the padding using two, three, or four values. As with margins, one value will apply on all four sides. Otherwise, the order the values are written will determine which sides each applies to:
- Two values apply to the top and bottom, then right and left.
- Three values apply to the top, then right and left, then bottom.
- Four values apply to the top, then right, then bottom, then left.

Each value may be represented as a fixed length or a percentage (which defines it as a percentage of the width of the container).
CSS Margins and Padding: Similar, But Not the Same
To space out elements in CSS, you’ll typically use the margin and padding properties. Understanding the difference is a step toward mastering CSS. You now also know how to set the margin and padding using the shorthand property, which is much quicker than defining each side independently.
In web design and web development, HTML and CSS go hand-in-hand. HTML defines content structure and semantics, while CSS establishes styling and layout. If you’re a beginner, we recommend becoming fully acquainted with HTML before attempting CSS. Keep going back to HTML as you learn CSS until you fully understand HTML. Once you’ve applied CSS, HTML becomes much more interesting.
Editor’s note: This post was originally published in April 2020 and has been updated for comprehensiveness.